For the last 15 months, five of us have been sharing the master bath. Today, that ends. I just finished up the renovation of the upstairs bathroom for the three youngest kiddos. Here's what it looked like before:
 |
| Builder-grade fixtures, vinyl tile, wallpaper border, broken medicine cabinet. |
Here's what it looks like now:
First I had an attic adventure installing a new fan and light. The new fan exhausted out the opposite side of the housing; I installed bracing between the ceiling joists so I could secure the housing against the joists with the exhaust pointing in the correct direction. The
original fan was 50 cfm; I went with 110 cfm on the new fan due to the
number and length of showers taking place.
There was no window, so I really wanted to brighten things up. I selected white hex tile for the floor and 3x6 subway tile for the walls behind the vanity. I used 6x6 white bullnose tile as the baseboard. The vanity, sink, and faucets are from Ikea, and I found the light at Shades of Light. The shower curtain is from Target. I went with hooks instead of towel bars because, you know, kids. The hooks are Delta Compel that I found at Menards. The toilet is the same Kohler Cimarron I've installed three other times. The paint is Hibiscus and Van Deusen Blue from Benjamin Moore.
Overall, I'm pretty happy with how it turned out, and the kids are sure happy to have their own bathroom.
***
I want to detail how I solved a special challenge I encountered because I could find very little guidance online.
The original vanity had a toekick register I knew I'd have to work around. The vanity I picked was up on legs, so I figured, "No problem." I'd just tile out a vent space in the floor and be good to go.
BUT, when I removed the vanity, this is what I found:
See the conduit and plumbing pipe on the floor? Here's a closer look:
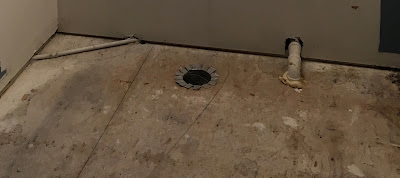
Serious bummer. How was I going to tile around this? Also, how was I going to route the vent for the HVAC? Before, the vanity was just sitting on top of the vent in the floor, with a toekick register placed on the front of the vanity. You could barely feel any air coming out of the vent. Pretty inefficient. I didn't want to return the vanity, so, after spitballing with my husband and son, I came up with the following solution. Part of my inspiration came from
this video. I'm including lots of detail because I couldn't find much guidance about this situation online:
 |
| First, I framed out the area with 2x2 lumber so I would have something to tile up to. | | | | |
|
|
|
|
|
|
|
|
|
|
|
|
|
|
|
|
|
|
|
|
|
|
|
|
|
|
|
|
|
|
|
|
|
|
|
|
|
|
|
|
|
|
|
|
|
|
|
|
|
|
|
|
|
|
|
|
|
|
|
|
|
|
|
|
|
|
|
|
|
|
|
|
|
|
 |
| Once the tile was finished and grouted, I removed the temporary frame, |
 |
| and installed a frame that matched the height of the baseboard tile I was using. |
|
 |
| Then, I fashioned a boot out of sheet metal and screws and screwed it to the floor and to the back of the frame so the heat and AC would be directed straight out the front. I caulked everything with air duct sealant, then turned on the AC to make sure all the air was making its way out the front. |
|
|
|
|
|
|
|
|
|
|
|
|
|
 |
| Here's a photo of the hole in the front of the frame for the register cover. I lined up the toekick register so I could mark where the screws would go into the frame. I tiled up to, but not over, the marked holes. |
 |
| Once the boot was installed and the register location marked, I topped the frame with 1/2" plywood and covered all surfaces in 1/4" backer board (I don't have a photo of that). |
 |
| I installed the 6x6 baseboard tile around the perimeter of the bathroom and around the frame. Then I tiled the top of the frame. This photo is before I grouted.... |
|
 |
| ...and here it is with the white epoxy stain-proof grout applied. |
 |
| Finally, I spray-painted the register and screws and installed. There's plenty of room to remove the register if needed. |
It's chilly now, and when the heat is on the floor actually feels warm, a major improvement over what existed before.


